|
Adding an Attachment to an Electronic Document |

|

|

|
Adding Attachments
AppCentral applicants have three options for making attachments to AppCentral documents: attaching items located on a local hard drive or network, attaching items via fax, or attaching items from the library of items associated with the applicant's AppCentral account.
When the applicant clicks the Add Attachment action, the Select Attachment Method Fly-Out opens to present the attachment options (Figure 16).
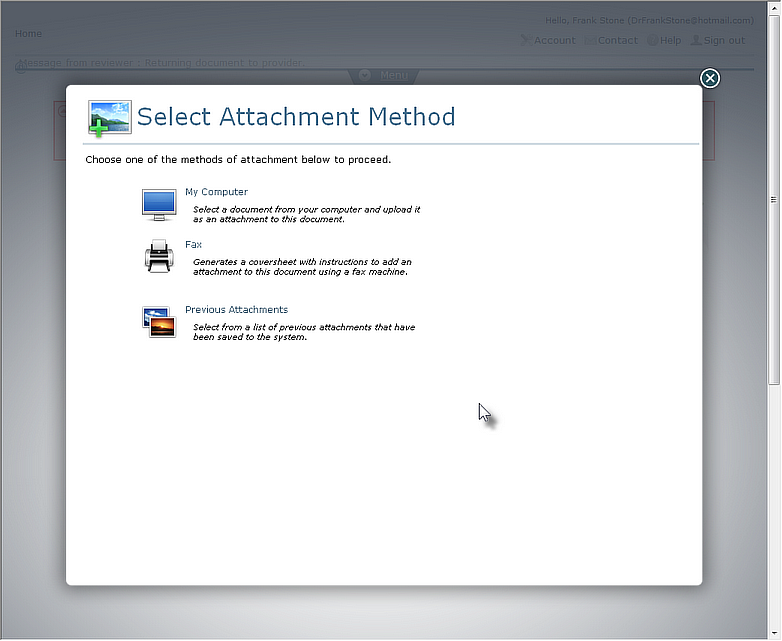
Figure 16
Attachment Methods
Making Attachments from "My Computer"
When the My Computer option is selected from the attachment methods (Figure 16), the Add Attachment from My Computer Fly-Out opens (Figure 17).
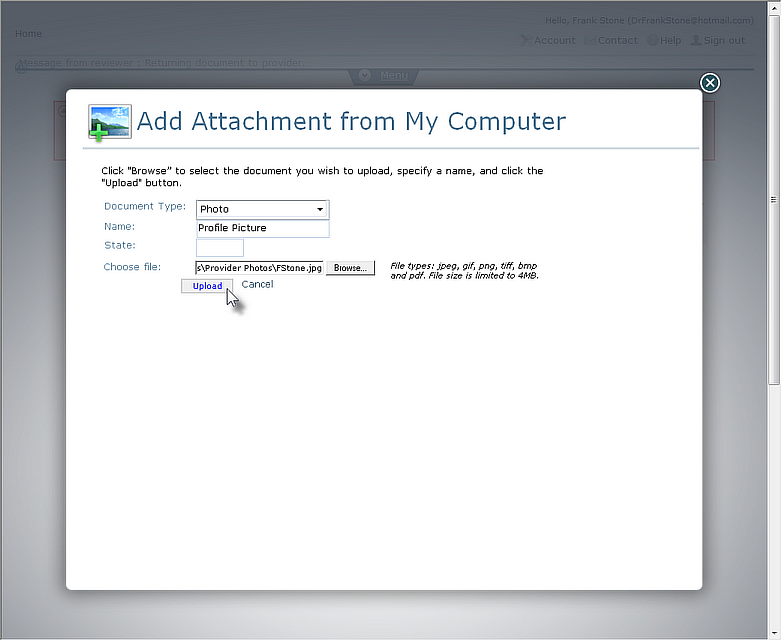
Figure 17
Add Attachment from My Computer Fly-Out
The Fields on this Fly-Out
Document Type Drop-Down Menu
The applicant may designate the type of item the attachment is (DEA license, State license, Insurance document, Profile Photo, etc.).
Name
The applicant may give the item a specific name in this field.
State
Some items such as license and insurance documents are specific to a single state. The applicant may designate that state in this field.
Choose File Field and Browse Button
When attaching an item from a local hard drive or network the applicant may locate the document via the Browse button and its location designated in the Choose file field.
Attaching a Document/Image From a Local Hard Drive or Network
| 1. | Designate the Document Type and Name of the attachment in the fields provided. |
| 2. | Designate an associated state for the attachment in the State field if necessary. |
| 3. | Enter the location of the attachment on a local hard drive or network in the Choose file field. Browse for the attachment via the Browse button if necessary. |
| 4. | Click the Upload button to attach the selected item to the related AppCentral document. |
The attachment is complete.
Making Attachments via Fax
When the Fax option is selected as the attachment method (Figure 16), the Add an Attachment via Fax Fly-Out opens (Figure 18).
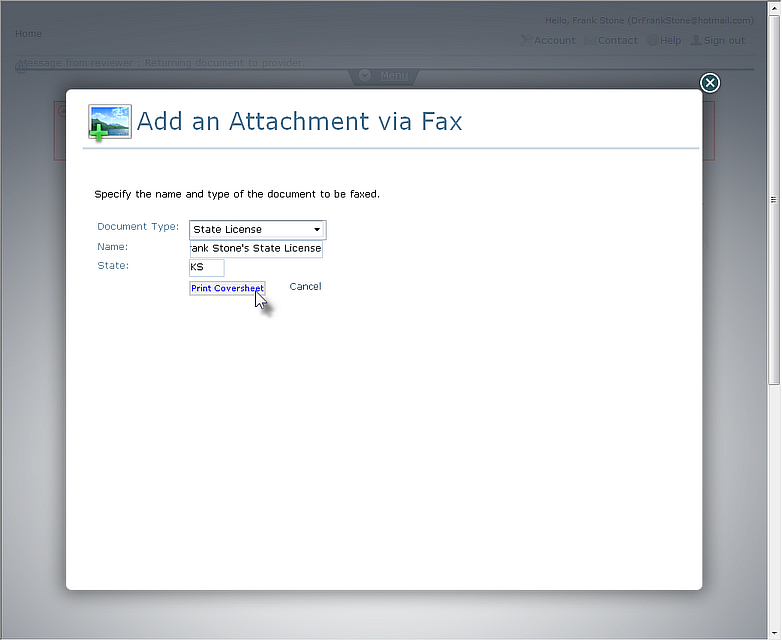
Figure 18
Add an Attachment via Fax Fly-Out
The screen features and fields for the fax attachment Fly-Out are identical to those available when attaching an item from a local hard drive or network with the exception of the Print Coversheet button. Since the applicant will be attaching the selected item to the related AppCentral document via fax, a coversheet must accompany the faxed item to route the fax to the applicant's AppCentral account.
Attaching a Document/Image via Fax
| 1. | Input the requested information into the fields provided. |
| 2. | Click the Print Coversheet button. A fax coversheet with a barcode is generated for use (Figure 19). |
ATTENTION:
It is absolutely vital the provided coversheet is included in the fax process as the first page. The coversheet barcode must be scanned by the fax machine before the attachment is scanned. This barcode contains encoded information specific to the applicant which enables AppCentral to correctly route the attachment to the applicant's AppCentral account and attach it to the related document.
| 3. | Fax the attachment to the number displayed on the fax coversheet with the coversheet as the first document to pass through the fax machine. The attachment is complete. |
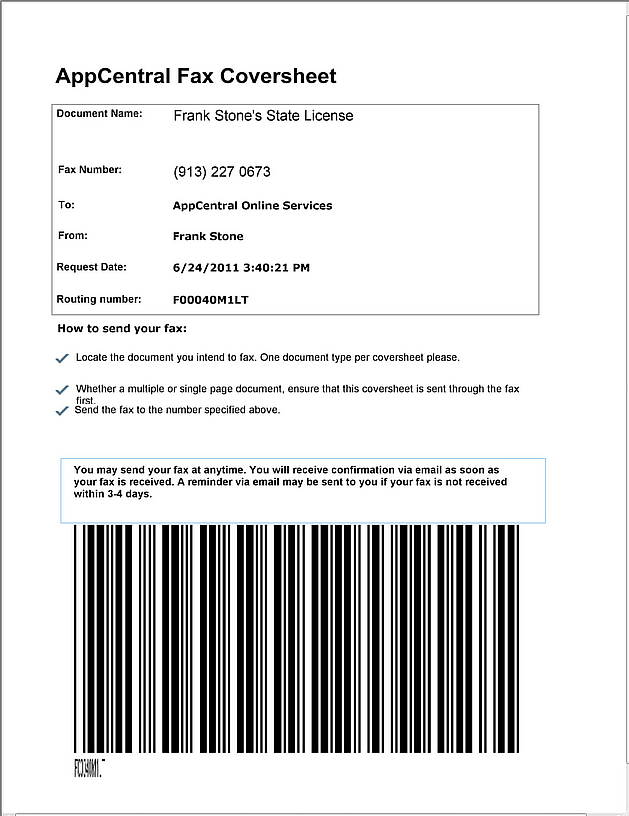
Figure 19
Attachment Fax Coversheet
Attaching an Item From the Applicant's Library
Every item an AppCentral applicant has attached to a document in the past is added to the applicant's library of items. Any of the items in this library may be attached to another document as part of another process. When the applicant selects the Previous Attachments option (Figure 16), the Add Attachments from My Library Fly-Out opens (Figure 20).
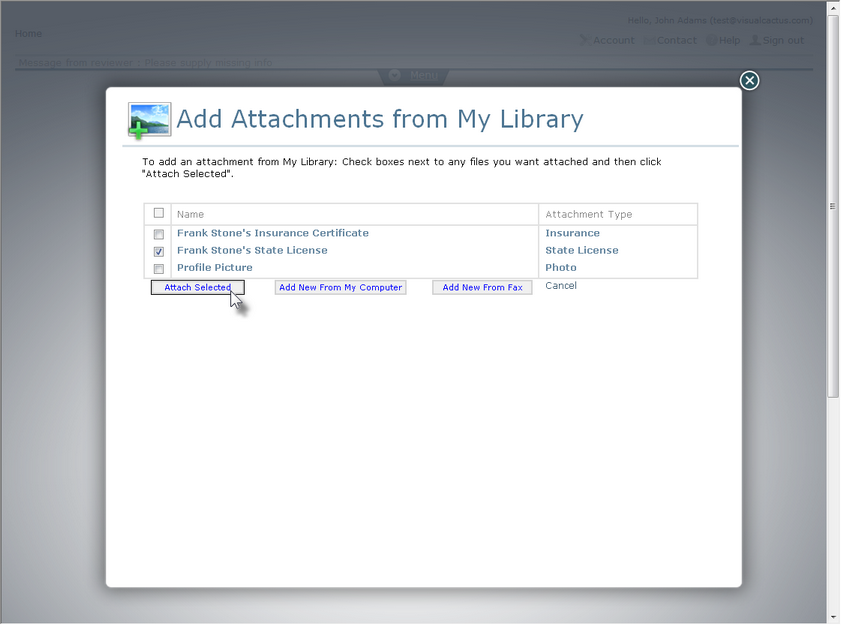
Figure 20
Adding Attachments from the Applicant's Library
All documents and images the applicant has ever attached to a document as part of an AppCentral process will be stored in the applicant's library. The applicant may now select any of these items for attachment to the current document.
Attaching a Library Item
| 1. | Select the item to be attached to the AppCentral document from the list of entries on the Fly-Out screen by checking its checkbox. Multiple attachments may be made by selecting multiple entries from the list. |
| 2. | Click the Attach Selected button to attach the selected item(s) to the AppCentral document. The attachment is complete. |
The applicant may attach a new item by selecting either the Add New From My Computer or Add New From Fax buttons (Figure 20) and following the instructions listed in this section for those attachment processes. Items attached via these button options will be attached to the current AppCentral document while also being added to the library for future use.
Return to the Electronic Document Section